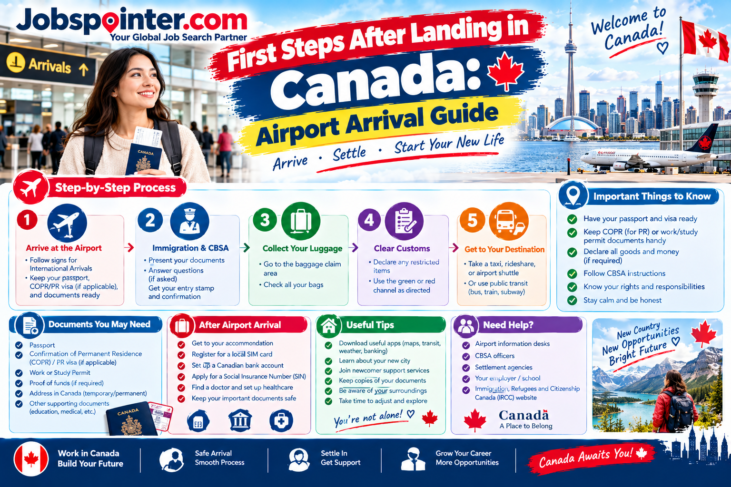
Airport Arrival Guide: First Steps After Landing in Canada
Landing in a new country is exciting and a little stressful, especially if it is your first time. The good news is that arrival at a Canadian airport follows a predictable order. The first steps after landing in Canada are: follow the signs to immigration, present your travel and immigration documents, complete your customs declaration, collect your bags, clear customs, check any permit or document an officer gives you, and then arrange safe transport to where you are staying.
This guide walks through those steps in order, explains what is different for workers, students, permanent residents and visitors, and separates what happens at the airport from what can wait until your first days in Canada.
Important: Nobody can guarantee entry to Canada. A visa, an electronic travel authorization (eTA) or a permit approval letter allows you to travel, but a border services officer makes the final decision on arrival. This article is general information, not legal advice.
Arrival at a glance: what changes by status
| Your status | What you usually show | What you may receive at the airport | Check before leaving the desk |
|---|---|---|---|
| Visitor | Passport, visa or eTA (as required), return or onward plans, accommodation details | Entry stamp or record, if applicable | Entry conditions and permitted stay |
| International student | Passport, study permit approval letter (port of entry letter), letter of acceptance, proof of funds if you have it | Your study permit, if you applied from outside Canada | Name, dates, school and any work conditions |
| Temporary foreign worker | Passport, work permit approval letter (port of entry letter), job offer details, employer contact | Your work permit, if you applied from outside Canada | Name, employer, job conditions, expiry date |
| New permanent resident | Passport, permanent resident visa if issued, Confirmation of Permanent Residence (COPR) | Your COPR completed and dated by the officer | Names, dates and details on the COPR |
The exact documents depend on your case. Always follow the instructions in your own approval letter.
1. Follow the Arrival and Immigration Signs
When you leave the aircraft, walk with the other passengers and follow the signs for Arrivals, Immigration or Border Services. Signs are in English and French, and many airports also have floor markings and staff who can point the way.
- Not sure where to go? Ask a uniformed airport employee or look for an information desk.
- Connecting flight? In most cases you are processed by Canadian border officers at the first Canadian airport where you land, even if you continue on to another city. Allow plenty of time between flights, and follow your airline’s transfer instructions.
- Keep your phone in your pocket until you reach the officer. Use it for directions if you need to, but be ready to put it away at the checkpoint.
2. Keep Your Travel and Immigration Documents Ready
Before you land, put your essential papers in your hand luggage, not your checked bag. If your suitcase is delayed, you can still complete the process.
Have these ready, as they apply to you:
- Passport (valid for your whole planned stay).
- Visa or eTA, if you are required to have one. Visa-exempt travellers who fly generally need an eTA before boarding.
- Port of entry letter of introduction, if IRCC issued one for your work or study permit. Print it or keep a copy you can show.
- Confirmation of Permanent Residence (COPR), plus a permanent resident visa if you were given one.
- Supporting documents: job offer, school acceptance letter, accommodation address and contact numbers, and proof of funds if relevant.
- Your declaration receipt, if you submitted an Advance Declaration.
Officers may ask to see documents that support your answers. Keep them in one folder, in the order you are likely to need them.
3. Complete Canadian Immigration and Border Checks
At many large airports, the first checkpoint is a Primary Inspection Kiosk or eGate. These machines let you confirm your identity and answer declaration questions on screen. According to the Canada Border Services Agency (CBSA), most air travellers can use the kiosks, and they work in many languages. They cannot be used with a non-machine-readable travel document, so those travellers are directed to an officer.
After the kiosk or eGate, you go to a border services officer who reviews your documents and declaration. The Government of Canada’s Entering Canada page explains that you will show your passport and your declaration receipt or card, and that the officer may send you to a secondary inspection area.
What the officer may ask
Expect short, direct questions such as:
- What is the purpose of your trip, and how long will you stay?
- Where will you stay, and who will you contact?
- If you are a worker or student: who is your employer or school, and what is your role or program?
- Do you have enough money to support yourself at the start?
Answer honestly and clearly. If you do not understand a question, say so. A wrong or misleading answer can cause more trouble than a slow one.
If you are sent to secondary inspection
This is a normal part of the process for some travellers. It can happen because of a routine check, a document that needs more review, or a customs question. It does not automatically mean something is wrong. Stay calm, keep your documents together and answer questions truthfully.
4. Complete Your Customs Declaration Correctly
Everyone arriving in Canada must make a declaration. There are three ways, depending on the airport:
| Method | How it works |
|---|---|
| Advance Declaration | At participating airports you can submit your customs and immigration declaration online up to 72 hours before arrival, then confirm it at a kiosk or eGate. |
| Kiosk or eGate | Scan your travel document and complete the declaration on screen. |
| Paper declaration card | Used at airports without kiosks or eGates; handed out on board or at the airport. |
The CBSA explains how the kiosks and eGates work, and Toronto Pearson’s customs page shows how one major airport applies the Advance Declaration process. Check your arrival airport’s own site, because availability differs.
What you must declare
- Food, plant and animal products. This includes fruit, vegetables, meat, dairy, eggs, seeds, nuts and homemade food. Even gifts from family count. See the CBSA’s Be aware and declare guidance.
- Currency and monetary instruments of CAN$10,000 or more, or the equivalent in another currency, in cash, cheques, drafts and similar items. You can bring in more than that; you simply must report it.
- Alcohol, tobacco, cannabis, firearms and weapons, and goods you plan to leave in Canada.
See the CBSA’s Bring personal goods into Canada page for restricted and prohibited goods. Failing to declare, or making a false or incomplete declaration, can lead to seized goods, fines or prosecution. If you are unsure whether something needs declaring, declare it and ask the officer.
Tip for newcomers moving long term: If you are bringing household goods that will arrive later, tell the officer. The CBSA has separate rules for people settling in Canada, linked from the personal goods page above.
5. Collect Your Baggage and Clear Customs
After the officer finishes, follow the signs to Baggage Claim. Check your flight number on the screens to find the right carousel.
If your bag is missing, delayed or damaged:
- Do not leave the baggage hall yet.
- Go to your airline’s baggage service desk and file a report.
- Keep your baggage tag and boarding pass.
- Give the airline your accommodation address and a working phone number.
This step is the airline’s responsibility, so ask them about delivery and compensation rules.
With your bags, you move to the final customs checkpoint. Keep your declaration receipt or card in your hand, because an officer may ask for it before you exit.
6. Collect Your Work Permit, Study Permit or Other Documents, If Required
This step applies to some travellers, not all. Many people already hold the documents they need.
Work permit and study permit holders
If you applied from outside Canada and were approved, IRCC may have given you a port of entry letter of introduction. IRCC states that this letter is not your work permit. You bring it with you and show it to the officer at the port of entry, who then issues the permit. The same letter system is used for study permits, as the IRCC Help Centre explains. Tell the officer you are there to receive your permit, and do not assume it will be handled automatically.
Check your permit before leaving the desk. Look at:
- Your name, date of birth and passport number
- The permit type, start date and expiry date
- Employer name or work conditions (for a work permit)
- School and work conditions (for a study permit)
If anything is wrong, tell the officer immediately, while you are still there. Correcting an error later can take much longer.
Warning: You cannot start working or studying under a permit you have not received. If you have only the letter, you do not yet have permission to work.
New permanent residents
If you are landing as a permanent resident, give your COPR to the officer. As the IRCC explains, the officer checks your documents, then signs and dates the COPR with your entry date. Keep it safe: it is your proof of status until your PR card arrives. Your first PR card is normally mailed to the Canadian address you give, so make sure that address is accurate and that you can receive mail there.
Visitors
Visitors usually do not receive a new document at the airport. Ask the officer how long you may stay if you are unsure.
7. Arrange Safe Transportation From the Airport
Before you leave the secure area, decide how you will reach your first address.
| Option | Good for | What to check |
|---|---|---|
| Airport train, bus or public transit | Budget travel, travelling light | Route, last service time, ticket machines |
| Licensed airport taxi | Late arrivals, heavy luggage | Official taxi line, estimated fare |
| Ride-hailing app | Travellers with working data | Pickup zone, driver and plate match |
| Pre-arranged pickup | Arrivals with an employer, school or host | Name, phone number, meeting point |
Stay safe:
- Use the official taxi stand or the airport’s ground transportation desk. Do not accept rides from people approaching you inside the terminal.
- Confirm the fare or the meter before you start.
- Share your trip details with a family member or friend.
- If you land late at night, book your accommodation and transport before you fly.
Each airport has its own transport options, so check your arrival airport’s website before departure.
8. Get Connected and Contact Your Accommodation
Before you leave the terminal, take five minutes to get online.
- Use the airport Wi-Fi to message your family, employer, school or host.
- Buy a Canadian SIM or set up an eSIM if your phone supports it. Compare plans after you settle in; the airport is rarely the cheapest option.
- Confirm your accommodation address and check-in time.
- Save key contacts and your address both on your phone and on paper, in case the battery dies.
If your phone is locked to another carrier, check before you travel whether it can accept a Canadian SIM.
9. Complete the First Essential Tasks After Arrival
These are not airport procedures. They are the tasks to start in your first days and weeks.
| Task | What to know |
|---|---|
| Social Insurance Number (SIN) | A nine-digit number needed to work in Canada. There is no fee. Eligible applicants include people with a valid work permit or a study permit that allows work. Use the official SIN application page and the required documents list. You need your actual permit, not just the approval letter. |
| Health coverage | Provinces and territories run their own plans. Some have a waiting period for newcomers and some do not, so check your province’s official website and consider private insurance for any gap. |
| Bank account | Bring your passport and permit or COPR. Ask about newcomer accounts. |
| Phone plan | Move from a short-term SIM to a longer plan once you know your address. |
| Settlement help | IRCC funds free newcomer services for eligible people. Use the newcomer services finder. Eligibility rules have changed for some permanent residents, so read the current conditions. |
| Records | Keep digital and paper copies of your passport, permit, letters, tax and work records. |
If you are job hunting, start with our guide to finding verified jobs in Canada on Jobspointer, browse current Canada job listings, and prepare your application with the Jobspointer resume builder. Remember that you need valid work authorization before you can start a job. No website, including ours, can promise you a job or a permit.
10. Common Mistakes to Avoid When Arriving in Canada
- Packing key documents in checked baggage. If the bag is delayed, so is your process.
- Not declaring food or plant products. Homemade snacks and gifts count.
- Assuming a visa or eTA guarantees entry. An officer makes the final decision.
- Leaving without checking your new permit. Fixing errors after you leave is harder.
- Confusing the approval letter with the permit. The letter is not a work or study permit.
- Accepting rides from unlicensed drivers. Use official options only.
- Sharing passport or document photos with strangers. Only share with your employer, school, bank or government offices when needed.
- Ignoring onward-flight and accommodation arrangements. Confirm both before you land.
11. First-Day Canada Arrival Checklist
Save or print this list.
Complete the immigration and border checks.
Make your customs declaration (online, kiosk, eGate or card).
Collect all baggage and clear customs.
Check any newly issued permit or COPR for errors before leaving the desk.
Arrange safe, official transport.
Contact your accommodation provider, employer, school or host.
Keep essential documents and valuables with you.
Note your next steps: phone plan, SIN, banking and health coverage.
Frequently Asked Questions
What should I do first after landing in Canada?
Follow the signs to the immigration checkpoint, use a kiosk or eGate if your airport has one, and then speak to the border services officer. Keep your documents in your hand luggage.
Which documents should I keep in my hand luggage?
Your passport, visa or eTA if required, port of entry letter or COPR, job or school letters, accommodation details and your declaration receipt, as they apply to you.
What questions can Canadian immigration officers ask?
Typically, the purpose and length of your stay, where you will stay, your job or school details, and how you will support yourself. Answer truthfully.
Do I need to complete a customs declaration?
Yes. Everyone arriving in Canada must make a declaration, whether online in advance, at a kiosk or eGate, or on a paper card.
Can I leave the airport after immigration and customs clearance?
Yes, once you have completed immigration, collected your baggage, and cleared the final customs checkpoint, you can leave. Check any permit or document you received before you go.
What should a foreign worker check before leaving the airport?
That you received your actual work permit (not just the letter), and that the name, passport number, employer details, conditions and expiry date are correct.
Can I apply for a SIN immediately after arriving in Canada?
Once you hold a valid permit that makes you eligible, you can apply through Service Canada’s official channels. Processing times vary, so check the official page. Do not pay anyone who offers to “fast-track” a SIN, because there is no application fee.
What should I do if my luggage is missing?
Report it to your airline’s baggage desk before leaving the baggage hall. Keep your baggage tag and give them your address and phone number.
Conclusion: Make Your Arrival in Canada Easier
Arriving in Canada is much simpler when you know the order: immigration, declaration, baggage, customs, document check, transport, then settlement tasks. Keep your papers in your hand luggage, declare honestly, check every permit before you leave the desk, and use only official transport. Because your obligations depend on your status, confirm the details on the official Government of Canada, CBSA and IRCC pages before you fly. When you are settled and ready to work, our Jobspointer Canada listings are a place to begin your search.